> ## Documentation Index
> Fetch the complete documentation index at: https://docs.amps.ai/llms.txt
> Use this file to discover all available pages before exploring further.
# Getting Started with Link UI
> Six-step auth at auth.amps.ai/{appId}: device-type, OEM, credentials (username/password, API key, OAuth2), MFA, device select, and consent.
## Overview
The Link UI is the hosted authentication flow your end users open to connect their OEM devices. It runs OEM selection, credential capture, MFA, device selection, and consent in a single sequence so your application never handles OEM credentials directly.
## Link UI URLs
The Link UI uses the same base URL for both Sandbox and Live environments. The environment is determined by a query parameter.
**Base URL:**
```
https://auth.amps.ai/{appId}
```
**Sandbox Environment:**
```
https://auth.amps.ai/{appId}?sandbox=true
```
**Live Environment:**
```
https://auth.amps.ai/{appId}
```
The `sandbox` query parameter accepts `true` or `1` to enable sandbox mode. If omitted, the environment defaults to Live.
Replace `{appId}` with your actual application ID from the dashboard.
Learn more about Sandbox and Live environments
## Authentication Flow
Users first select the type of device they want to connect (e.g., Vehicle, Solar Inverter, Battery, HVAC, etc.)
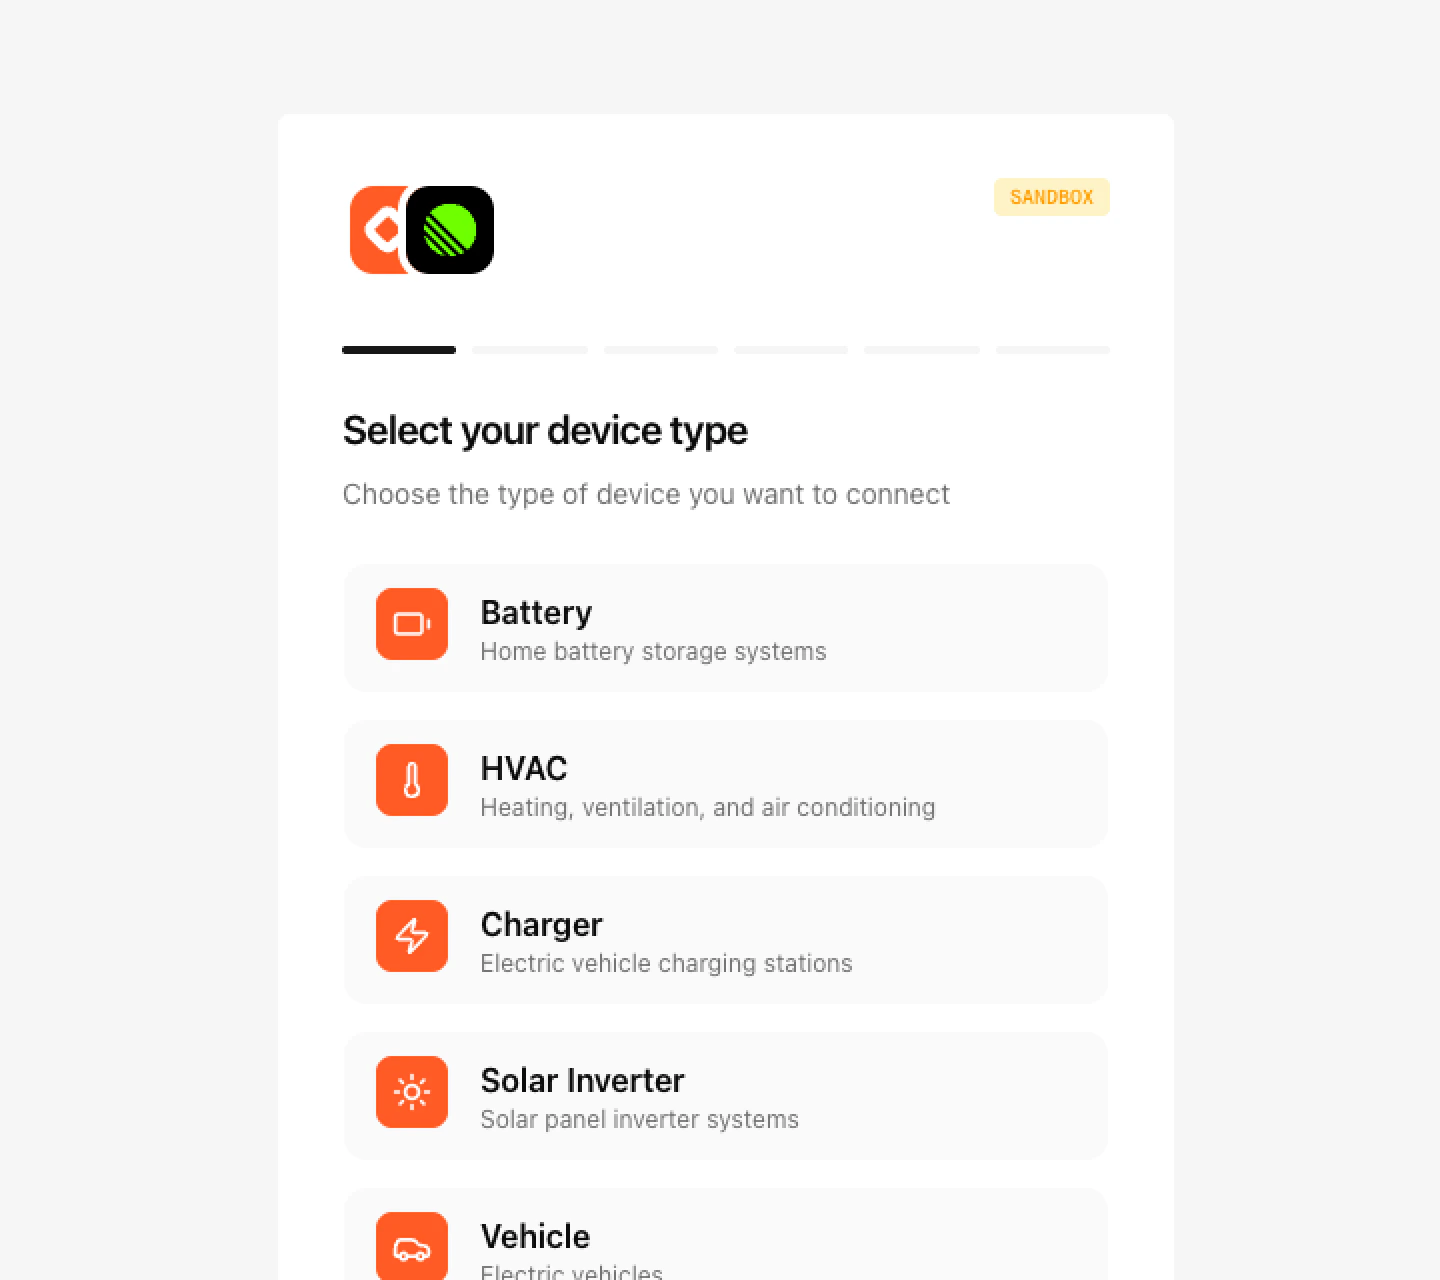 Users select which OEM they want to connect (e.g., Tesla, Enphase, Nest, etc.)
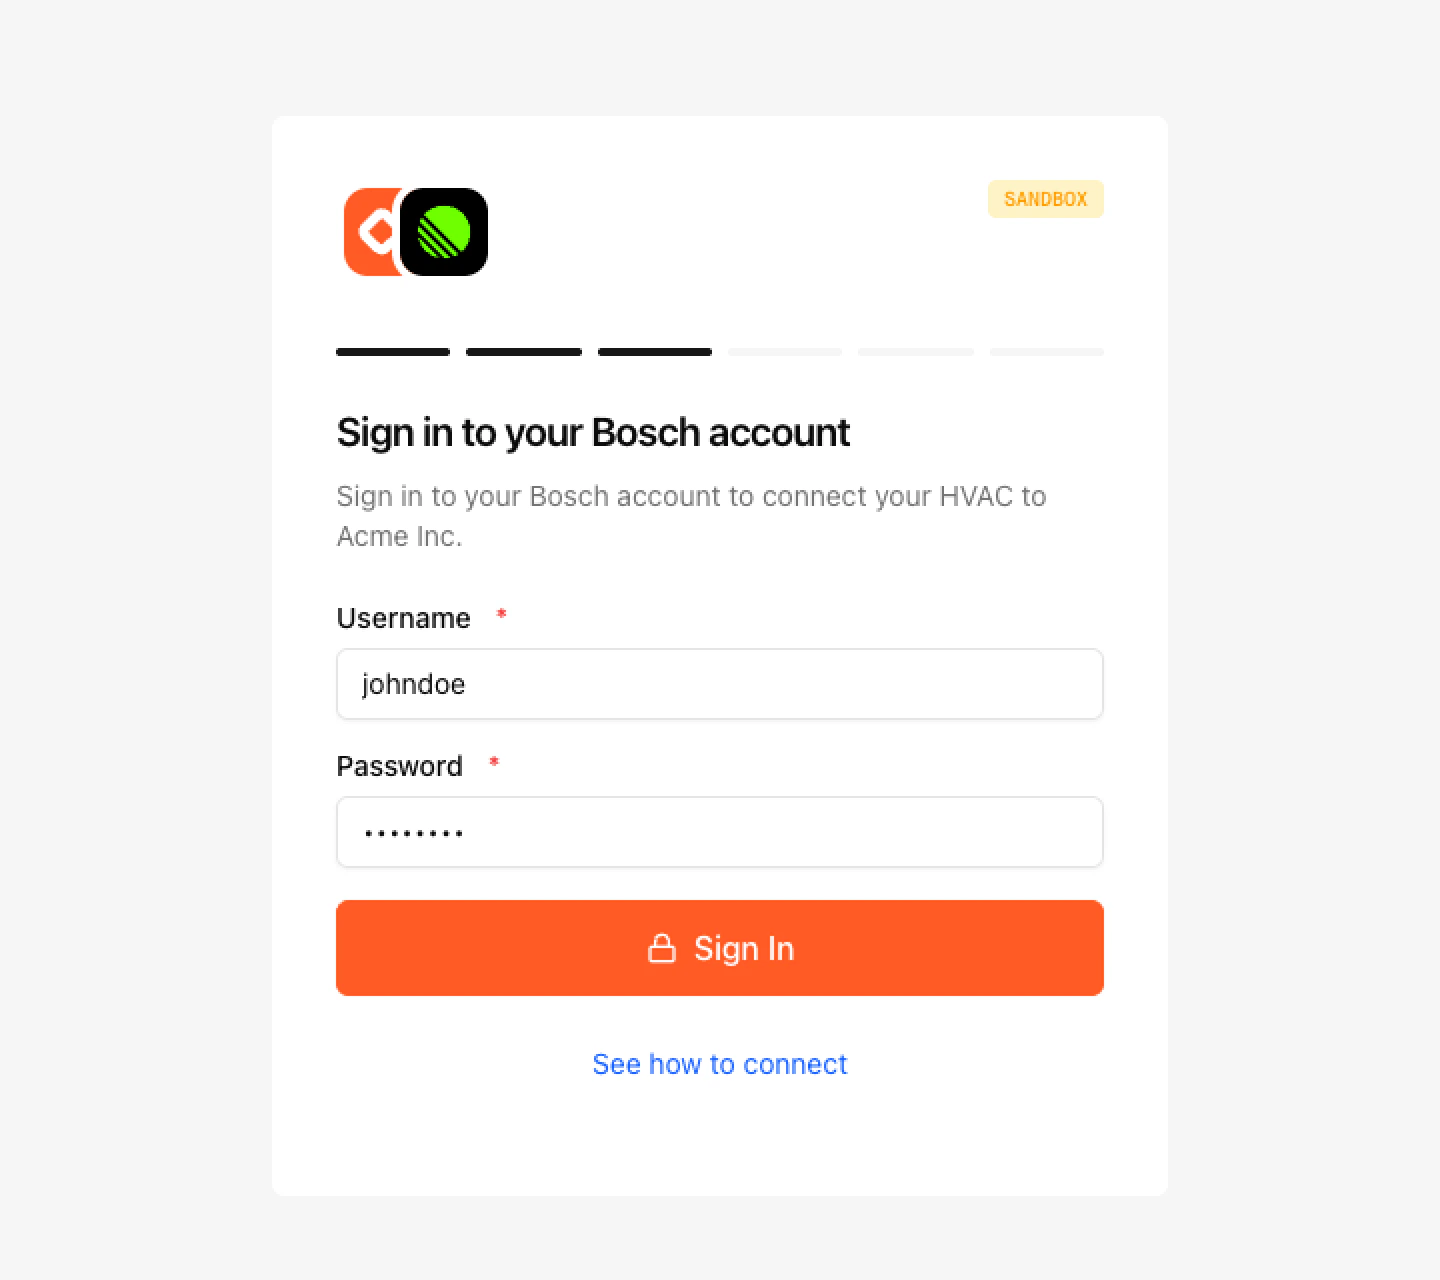
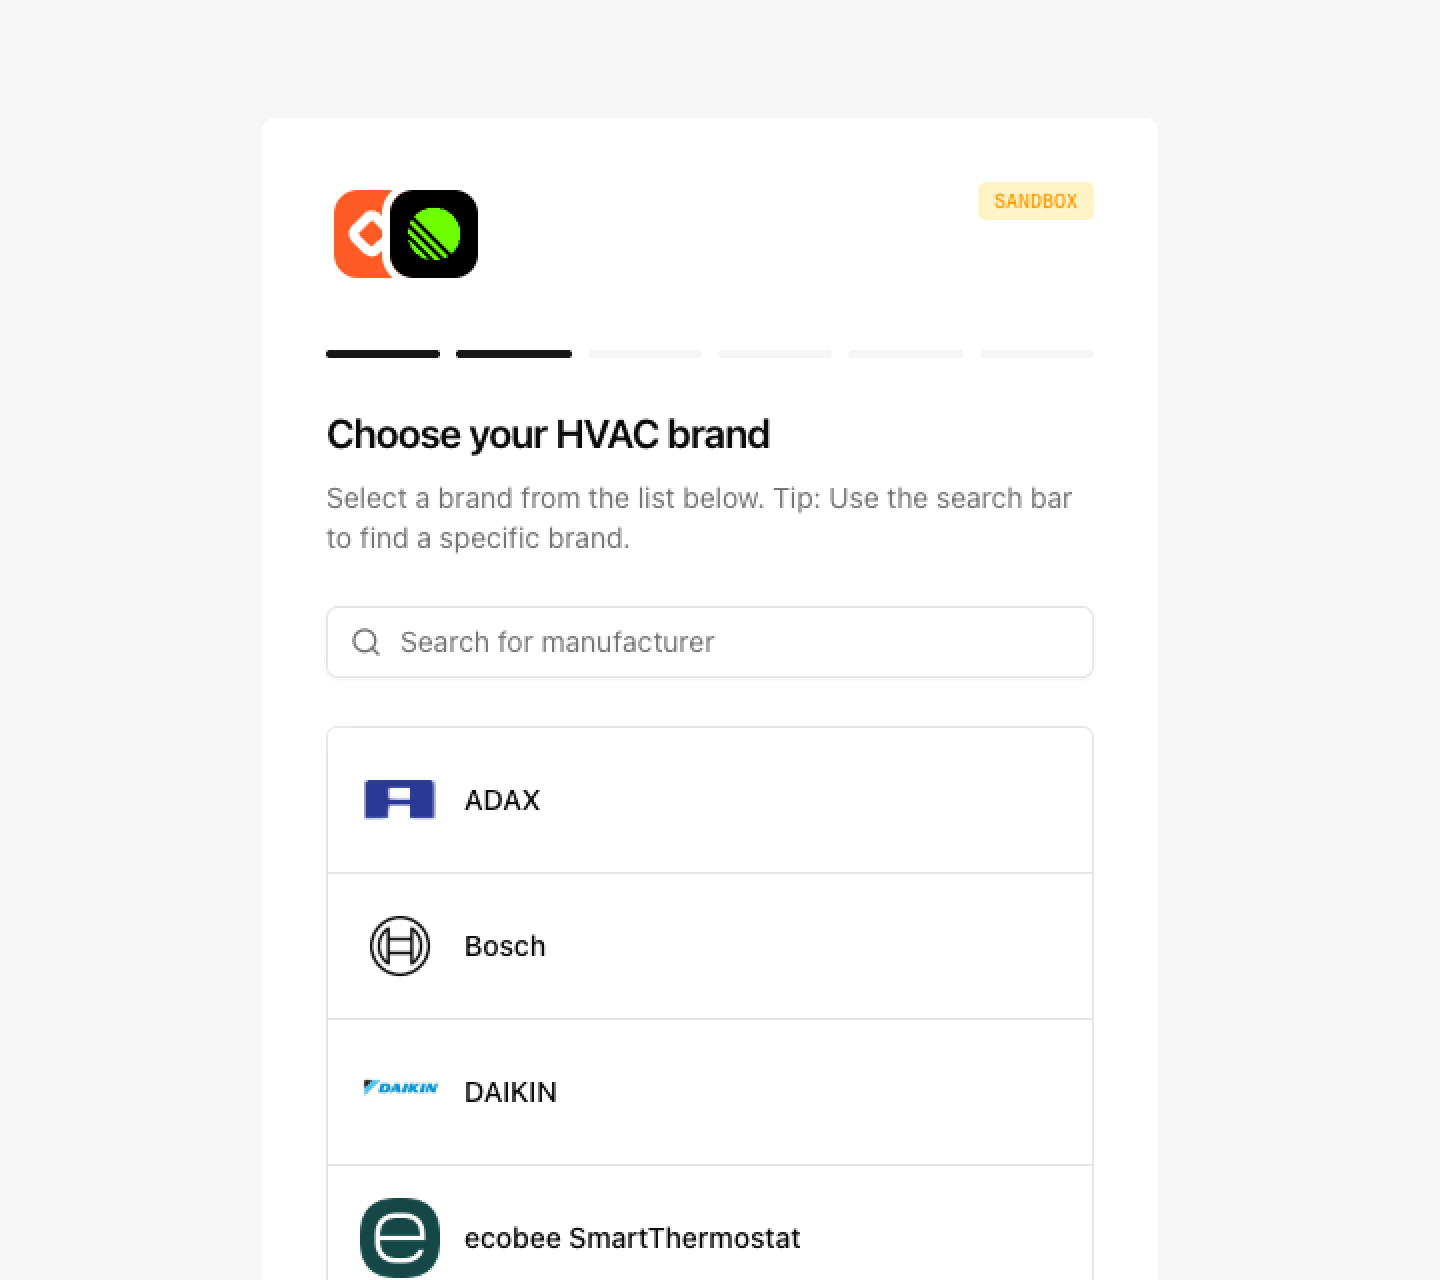 Users authenticate using one of three methods supported by the OEM:
* **Username/Password**: Traditional login credentials
* **API Key**: OEM-provided API key
* **OAuth2**: OAuth flow for supported OEMs
Users authenticate using one of three methods supported by the OEM:
* **Username/Password**: Traditional login credentials
* **API Key**: OEM-provided API key
* **OAuth2**: OAuth flow for supported OEMs
 If required by the OEM, users complete MFA verification
Users select which devices they want to connect from their OEM account
Users grant permissions and devices are registered to your customer account
## Connection Types
Different OEMs support different authentication methods:
Traditional username and password authentication. Users enter their OEM account credentials directly.
API key-based authentication. Users provide an API key issued by the OEM.
OAuth 2.0 flow for supported OEMs. Users are redirected to the OEM's authorization page.
## Integration Options
Direct users to the Link UI URL. After completion, they'll be redirected back to your application.
Embed the Link UI in an iframe within your application (if supported).
## What Happens After Connection
Once devices are connected:
1. **Device Registration**: Devices are registered to your customer account
2. **Immediate Access**: You can immediately query device data via the API
3. **Webhook Notifications**: You'll receive `device.connected` webhook events
4. **Device Management**: Devices appear in your dashboard and can be managed via API
## Security & Privacy
The Link UI handles all credential storage securely. Credentials are encrypted and stored separately from your application.
* Credentials are never exposed to your application
* All authentication happens directly with the OEM
* Users maintain full control over their device connections
* Users can disconnect devices at any time
## Reconnection Flow
Users can reconnect devices without re-entering credentials, as long as their credentials remain valid with the OEM.
Reconnection occurs when:
* A user wants to add more devices from the same OEM
* Credentials need to be refreshed
* Device connection status needs to be verified
If credentials are no longer valid, users will be prompted to re-authenticate through the full connection flow.
## Troubleshooting
Ensure the OEM is supported in your environment. Some OEMs may only be available in sandbox or live environments.
Verify that:
* The OEM credentials are correct
* MFA is completed if required
* The OEM account has proper permissions
* The OEM service is not experiencing outages
Check that:
* The OEM account has devices registered
* Device permissions are granted during consent
* The device type is supported by Amps AI
## Next Steps
Learn about advanced configuration options
Learn how to authenticate your API requests
Set up webhook endpoints
Explore the full API documentation
If required by the OEM, users complete MFA verification
Users select which devices they want to connect from their OEM account
Users grant permissions and devices are registered to your customer account
## Connection Types
Different OEMs support different authentication methods:
Traditional username and password authentication. Users enter their OEM account credentials directly.
API key-based authentication. Users provide an API key issued by the OEM.
OAuth 2.0 flow for supported OEMs. Users are redirected to the OEM's authorization page.
## Integration Options
Direct users to the Link UI URL. After completion, they'll be redirected back to your application.
Embed the Link UI in an iframe within your application (if supported).
## What Happens After Connection
Once devices are connected:
1. **Device Registration**: Devices are registered to your customer account
2. **Immediate Access**: You can immediately query device data via the API
3. **Webhook Notifications**: You'll receive `device.connected` webhook events
4. **Device Management**: Devices appear in your dashboard and can be managed via API
## Security & Privacy
The Link UI handles all credential storage securely. Credentials are encrypted and stored separately from your application.
* Credentials are never exposed to your application
* All authentication happens directly with the OEM
* Users maintain full control over their device connections
* Users can disconnect devices at any time
## Reconnection Flow
Users can reconnect devices without re-entering credentials, as long as their credentials remain valid with the OEM.
Reconnection occurs when:
* A user wants to add more devices from the same OEM
* Credentials need to be refreshed
* Device connection status needs to be verified
If credentials are no longer valid, users will be prompted to re-authenticate through the full connection flow.
## Troubleshooting
Ensure the OEM is supported in your environment. Some OEMs may only be available in sandbox or live environments.
Verify that:
* The OEM credentials are correct
* MFA is completed if required
* The OEM account has proper permissions
* The OEM service is not experiencing outages
Check that:
* The OEM account has devices registered
* Device permissions are granted during consent
* The device type is supported by Amps AI
## Next Steps
Learn about advanced configuration options
Learn how to authenticate your API requests
Set up webhook endpoints
Explore the full API documentation